

There may be situations in which an email is sent via an email alert that you would like to log as an activity. Currently, the emails alerts are not logged as an activity history. To bridge this functionality gap, we can create an email message record once the email alert is sent when a case is closed using process builder.
Note: You can only use the text email version of the enhanced email message and not the HTML version of the email. This is currently a limitation of creating new email messages via Process Builder.
Here are a few lessons learned from implementing this use case:
- To send an email from Salesforce via process automation tools, you need an email alert.
- Email message is a standard object introduced in Summer 16.
- Use process builder to create the email message record.
- Provide descriptions, where provided, in Salesforce. This may be tedious step, I know, but your future self will thank you when you are trying to remember what you configured or assist other/future admins when troubleshooting or enhancing what was built. This includes email template, email alert or providing the purpose of a process builder, etc.
Business Use Case: Addison Dogster is a system administrator at Universal Container. Sally Sunshine is the Operations Manager. Sally would like to log all customer interactions as an activity, including systematic emails that are sent. Currently, a customer receives an email when the case is closed but there is no record of this email sent to the customer in the customer’s or case’s activity history.
Solution: Being the Awesome Admin that she is, Addison is able to solve this declaratively using process builder to mimic the email alert to log in the activity history.
Quick Steps:
Pre-requisite:
Confirm that Enhanced Email is enabled in your org.
Note: You can confirm this in Salesforce Classic in Setup via Customize | Email | Enhanced Email. In Lightning, you can confirm this setting via Email | Enhanced Email.
The email template, email alert and process to send the email when the case is closed have already been created in the org.


1. Since our email message as mail merge fields in it, we will need to chunk out the email message into several text entries using Custom Labels.
In Classic, Custom Labels is found under Create | Custom Labels. In Lightning, you can find it under User Interface | Custom Labels. When in doubt, use the Quick Find.
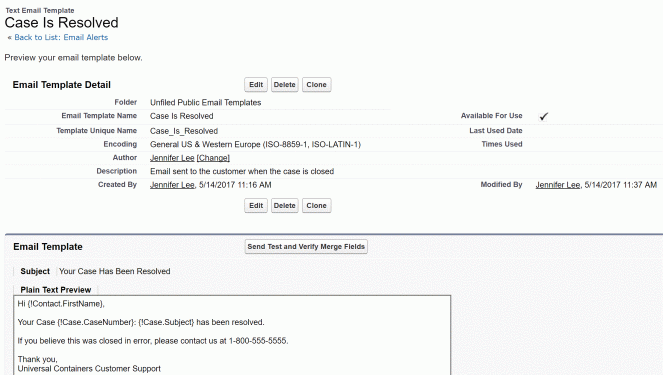
This is the email message we need to reproduce:
Hi {!Contact.FirstName},
Your Case {!Case.CaseNumber}: {!Case.Subject} has been resolved.
If you believe this was closed in error, please contact us at 1-800-555-5555.
Thank you,
Universal Containers Customer Support
You will create 4 custom labels:
- ClosedCaseEmailEmailMessageText1: “Hi”
- ClosedCaseEmailEmailMessageText2: “,
Your Case”
- ClosedCaseEmailEmailMessageText3: “:”
- ClosedCaseEmailEmailMessageText4: “has been resolved.If you believe this was closed in error, please contact us at 1-800-555-5555.Thank you,
Universal Containers Customer Support”
Here is the end result…

2. Now, let’s update the existing process builder. Locate the process by going to Create | Workflows & Approvals | Process Builder in Salesforce Classic or Process Automation | Process Builder in Lightning Experience.

A. Locate the existing process called “Take Action on New/Existing Cases,” click on the process name, then click on the Clone button.
B. Let’s add a new immediate action in the existing solo criteria node.
- Action Type: Create a New Record
- Action Name: Log the Email to Activity History
- Record Type: Email Message
- Set Field Values:
- Status Picklist Sent
- From Address String CustomerSupport@UniversalContainers.com
- Case ID Reference [Case].Id
- Subject String Your Case Has Been Resolved
- To Address Reference [Case].ContactEmail
- Text Body Formula$Label.ClosedCaseEmailEmailMessageText1 + ” ” + [Case].Contact.FirstName + $Label.ClosedCaseEmailEmailMessageText2 + [Case].CaseNumber + $Label.ClosedCaseEmailEmailMessageText3 + ” ” + [Case].Subject + ” ” + $Label.ClosedCaseEmailEmailMessageText4

Here are the steps as shown in the animated gif.

C. Click on the Activate button to activate the process builder.
That’s it! Congrats! You’ve implemented a process to log an email when an email alert is sent to the customer.
Now, before you deploy the changes to Production, you need to test your configuration changes.
- Create a contact.
- Create a case from the contact record. Ensure there is a subject.
- Close the case.
- Confirm that the email is logged in the case’s Activity History.
Deployment Notes/Tips:
- Process builder and custom labels can be deployed to Production in a change set (or can be deployed using a tool such as Dreamfactory’s Snapshot).
- Activate process builder as it is deployed as inactive into Production.
