

Here are a few lessons learned from implementing this use case:
- Learn about the Salesforce feature Login Flows and example use cases.
- Provide descriptions, where provided, in Salesforce. This may be tedious step, I know, but your future self will thank you when you are trying to remember what you configured or assist other/future admins when troubleshooting or enhancing what was built. This includes variables, the purpose of a flow, what each flow element does, etc.
This post is meant to spark creativity for use cases to leverage the Login Flows feature to inform users, collect information from users, detect whether the user is accessing Salesforce from outside the corporate network and challenge the user with two factor authentication, direct users by profile to different locations post login, take other actions “behind the scenes” when a user logs into Salesforce.
Before we go further, what is Login Flows?
This is a feature introduced in Winter ’15. A login flow provides the ability to build custom business processes, invoked at user login. With this feature, you can integrate a custom process with the Salesforce authentication engine, and also engage the user in the authentication decision process during the login process.
In Salesforce Classic, Login Flows appears under Security Controls. In Lightning Experience, Login Flows appears under Identity.
Login Flows is essentially a configuration to the flow to execute, the user license and profile you wish to execute the login flow. One thing to note that since this is only configurable to one profile, if you want the same login flow for all users, you will need to create a login flow for each profile in your org.

There are specific variables using the exact naming convention for your variable will make additional data available for use in your login flow.
- LoginFlow_LoginType
- LoginFlow_IpAddress
- LoginFlow_UserAgent
- LoginFlow_Platform
- LoginFlow_Application
- LoginFlow_Community
- LoginFlow_SessionLevel
- LoginFlow_UserId
Additionally, there are two output attributes that can be set inside the flow:
- LoginFlow_FinishLocation – String type. Setting this variable will determine where to send the user when the flow completes.
- LoginFlow_ForceLogout – Boolean type. Setting this variable to true immediately logs the user out.
Salesforce also provides an unmanaged package of sample login flows you can install in your org, including a flow for conditional 2 factor authentication (2FA) if the user is logging into the org outside of your corporate network but will bypass 2FA, if on the network.
Now that we’re all clear about Login Flows, let’s continue on…
Business Use Case: Addison Dogster is the system administrator at Universal Containers. Steven Moon is the Director of Sales and Operations. Steven noticed that when he looks at the Chatter feed, many users do not have a profile picture. He asked Addison to notify users to add a profile page if the user does not already have one.
Solution: Universal Containers has Chatter enabled for certain profiles in the org, Standard Platform User, which the users belong to. Being the #AwesomeAdmin that Addison is, she was able to solution this notification declaratively using login flow. While she could have used email notification or posts to the user’s Chatter feed, Addison chose to remind the user upfront upon login and make it easy for them by directing them to the profile page so they can change it then and there. (Note: The redirect to the Chatter profile page in the solution will only work on Classic.)

Quick Steps:
Pre-requisite: You already have Chatter enabled in the org or for a profile.
1. Let’s create a visual workflow to handle the assignment/removal of the Call Center and Sales Console User permission set license that will be invoked from process builder.
For those using Salesforce Classic, visual workflows can be found in Create | Workflows & Approvals | Flows. In Lightning Experience, it is found under Process Automation | Flows.
A. First, we will create all the variables we need to reference in our flow. This is done by going to the Resource tab in the Flow Designer and creating a new variable.
Best practice tips: Don’t forget to provide a description so you and other/future admins know what the variable is.
This first variable will store the user’s first name.

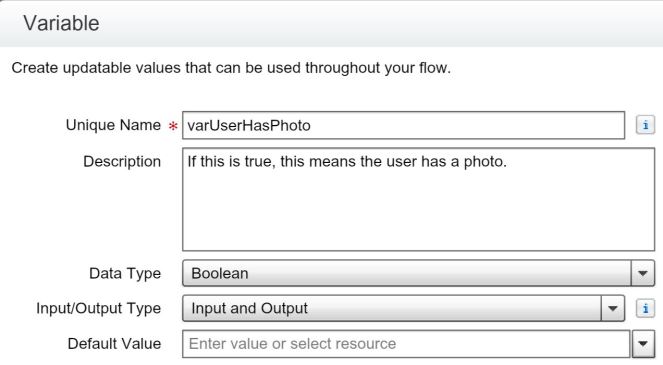
The next variable stores whether the user has an active Chatter photo as a checkbox (boolean).
The next variable needs to be uniquely names LoginFlow_UserId and must be an Input Only type. This will automatically populate with the user’s ID when we configure the login flow feature.

The next variable needs to be uniquely names LoginFlow_FinishLocation and must be an Output Only type. This will automatically redirect the user to the chatter page at the end of our flow when we configure the login flow feature.
Note: This only works in Salesforce Classic. I have not been able to determine the URL to use for the equivalent page in Lightning Experience.

The value shown in the default value can be found by navigating to the page you want to redirect your user to. In this case, we are navigating to the chatter profile page. Copy the highlighted yellow from the URL bar into the Default Value field.

B. Create another Resource – Text Template called ChatterMessage.
Best practice tips: Don’t forget to provide a description so you and other/future admins know what this text template is used for.

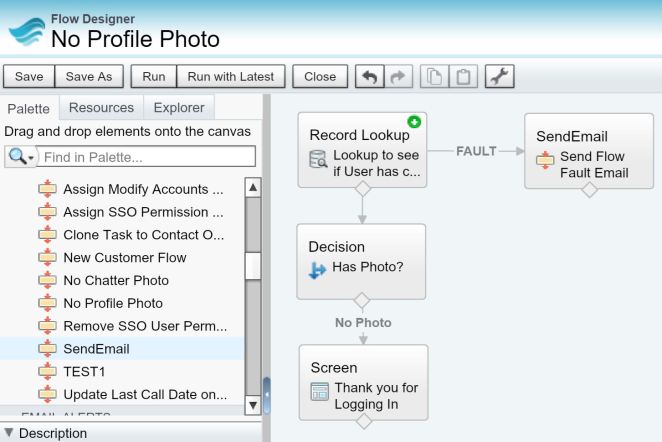
C. Create the a Record Lookup flow element on the User object were the Id equals the variable LoginFlow_UserId. Once found, we will take the value in the FirstName field and store it in the variable varFirstName and the value in the field IsProfilePhotoActive and store it in the variable varUserHasPhoto.
Best practice tips: Don’t forget to provide a description so you and other/future admins know what this record lookup does.

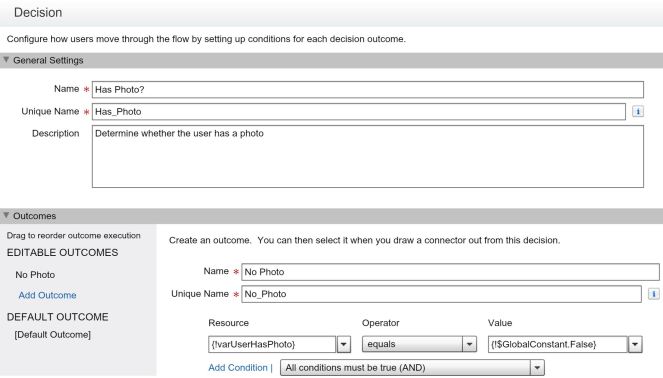
D. In our next step, we add a Decision flow element where our one outcome will look a the variable varUserHasPhoto is false. We only want to continue this flow is the user does not have a photo.
Best practice tips: Don’t forget to provide a description so you and other/future admins know what this decision does.
E. We are going to create a Screen flow element. We will call this Thank you for Logging In. Set the navigation option to “Don’t show Previous button” and uncheck Show Pause button.
Best practice tips: Don’t forget to provide a description so you and other/future admins know what screen is for.

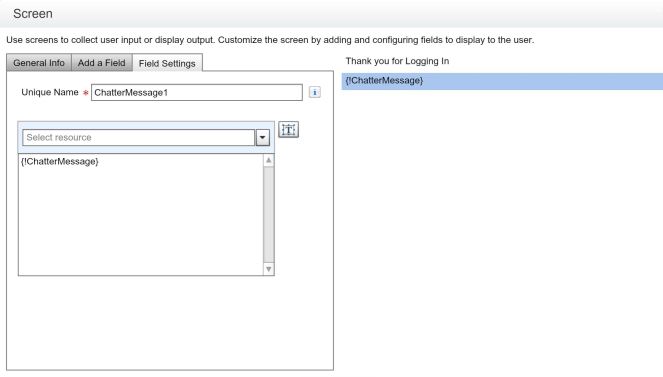
Click over to the Add a Field tab and drag a Display Text field.

Double-click to configure the field settings. We will call this “ChatterMessage1” Here, we will select the text template created earlier, ChatterMessage.
It should look like the below…
F. Add the subflow Send Flow Fault Email. For instructions on how to create this, go to Step 2 of blog post: Maximize Maintainability With Process Builder and Componentized Visual Workflow.
G. Set your flow starting point. And connect the flow elements and the fault connectors to match the below…

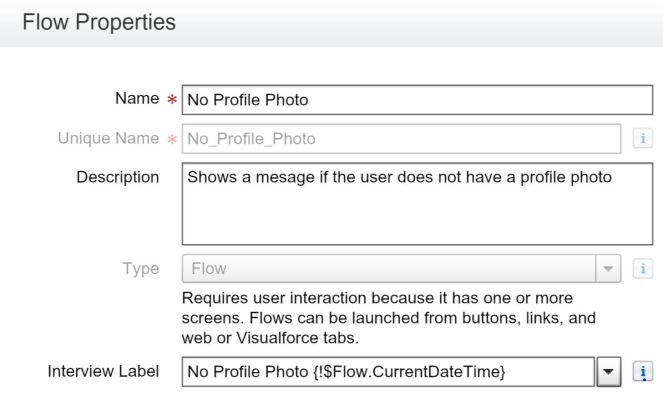
H. Save as and provide the following properties.
Best practice tip: Provide a description so you and other/future admins know what this flow element is used for.
I. Click the “Close” button.
J. On the flows screen, activate the flow.

2. Now, we need to create the Login Flow for the Standard Platform user profile.
In Salesforce Classic, go to Security Controls | Login Flows. In Lightning Experience, go to Identity | Login Flows.
Click on the New button.
Then, provide the following and Save the button:
Name: <You specify the name of this login flow>
Flow: <Select the flow you created in Step 1>
User License: Salesforce Platform (select the user license)
Profile: Standard Platform User (select a profile you want the login flow to apply to)
Congrats, you configured the solution! You’ve implemented a process to remind the user to update the chatter profile photo upon login.
Now, before you deploy the changes to Production, don’t forget to test your configuration changes.
- Create a new or update an existing user who does not have a Chatter profile photo and assign the user to the profile configured with the login flow.
- Log into Salesforce. You should see the Chatter message.
- Add a Chatter profile photo.
- Logout.
- Login as the same user. Confirm that there is no message shown upon login.
Deployment Notes/Tips:
- Visual workflow can be deployed to Production in a change set (or can be deployed using a tool such as Dreamfactory’s Snapshot).
- Activate the visual workflow as it is deployed as inactive into Production. This step needs to happen before the login flow is created.
- Login Flows need to be manually added in the target environment as it is not a component in change sets.

Great post and use case. Two things I would emphasize:
1. Always do these in a sandbox first. Eventhough you can create flows in production do not do it in production. ESPECIALLY login flows
2. Do NOT apply a login flow to your admin users until you’re 100% positive it works. Test it with other sandbox user first. If your flow errors it can prevent you from getting access… and there’s no way for you to fix it then!
LikeLike
Agreed. Great points!
LikeLike
I don’t see a point where you have used the variable LoginFlow_FinishLocation to actually redirect the user to the Chatter profile page.
LikeLike
You just need to specify the variable with the exact naming convention as noted in the post. There is no flow element that references this variable. Hope that helps.
LikeLike
This post could detail so much more 😦 You should write more about it sometime?|
LikeLike
Can you elaborate on what additional details you are looking for? I provide screenshots of how to build this.
LikeLike