
For the developers out there, you are most likely familiar with the software principle “DRY” and avoid “WET.”
My #AwesomeAdmins, don’t start zoning out, please stay with me for a bit. If you find opportunities to make configuration DRY, where possible, you will minimize the time you spend on maintaining processes you’ve built going forward and focus that time on more value add activities, such as working on implementing new features for your users.
What is DRY, you ask?

Essentially, when you find yourself writing code (or in this case, configuration) that is similar or equal to something you’ve written (or configured) before, take a moment to think about what you’re doing and don’t repeat yourself.
Just think, have you ever worked on processes where you are creating the same immediate or scheduled actions within the same process or in multiple processes?! And, if you need to make a change to them later, you are making the same change multiple times? That’s an example of processes that are unDRY. You are repeating yourself. Wouldn’t you much rather create it once and reference this in all the instances where the configuration is exactly the same and when you need to make a change to it, you make it ONCE and it is reflected everywhere? That requires a DRY solution.
Violations of DRY are typically referred to as “WET” solutions, which is known as “write everything twice”, “we enjoy typing” or “waste everyone’s time.”
Note: DRY and modular architecture require good planning, which means it will take more time coming up with that solution. However, I guarantee you that the time you spend on that DRY solution will save you so much time down the road that would have gone to maintaining an unDRY solution. Less time maintaining existing and more time towards new features/functionality. Do I have your attention now?

With Winter 17, we can now build reusable processes with the introduction of invocable processes! We now have the ability to build DRY solutions. Hooray!
There are two reasons why you may want to use invocable processes:
- Modularize sections of your processes. Call it from multiple processes or from multiple action groups in the same process. Update those actions in one invocable process, all processes then use the updated actions.
- Implement simple nested if/then statements using invocable processes. Rather than build flow or write code, build the second level of logic into another process.
This blog post will focus on a use case that satisfies the first reason listed above. I will publish another blog post to cover off on the second reason.
Here are a few lessons learned from implementing the use case:
- Build reusable processes to minimize initial setup time and later on, re-work/ maintenance time.
- Provide descriptions, where provided, in Salesforce. This may be tedious step, I know, but your future self will thank you when you are trying to remember what you configured or assist other/future admins when troubleshooting or enhancing what was built. This includes providing the purpose of a process builder, etc.
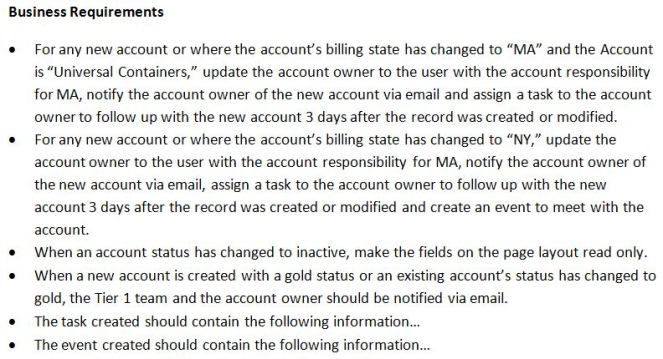
Business Use Case: Addison Dogster is the system administrator at Universal Containers. Sally Sunshine is the Sales Manager. Sally provided the following requirements for Addison to automate in Salesforce.
Solution:
Prior to the Winter 17 upgrade, Addison came up with a declarative solution using process builder with the following criteria and immediate actions, a visual workflow to update the account owner on the account by performing a lookup to the user record to pull a value from a custom field “State Responsibility,” two email templates and email alerts, new account record type called Account Closed and a new account page layout (all fields are read only). (Note: The custom account status field was an existing field.)

Here is her process builder and visual workflow solution:


For the first two criteria nodes, Addison repeated the exact configuration of the three immediate actions: Invoke flow, Send email to the account owner and Assign a Task.

If Addison built her solution in Winter 17, she can leverage the feature of invocable processes in Process Builder. Rather than have two separate copies of the same immediate actions within the same process and repeat herself in configuration steps, #AwesomeAdmin Addison can move these into its own process and invoke this process from the “master” New/Updates to Existing Accounts process, to create a DRY solution, so she is only creates these steps once and if in the future, she needs to make any modifications, she is only making that change once in the invocable process and all references to that process will be automatically updated. She avoided a WET solution because she doesn’t enjoy typing the same thing over and over.
Here is her updated process builder design:

Here is the improved, built “master” process builder, with the modification to the immediate action of the first two nodes, calling an invocable process for the first three actions. The other two criteria nodes remains unchanged.

Here is the invocable process:

The below are quick steps on how to replicate the improved solution in your org and tweak it for your own purposes. Since the focus of this blog post is about invocable processes, the steps below will only cover setting up an invocable process and invoking a process from a “master” process. It will not cover the creation of the update account owner visual workflow.
Quick Steps:
1.Let’s first create the invocable process. For those using Salesforce Classic, process builder can be found in Create | Workflows & Approvals | Process Builder. In Lightning Experience, it is found under Process Automation | Process Builder.
On the initial creation screen, provide a process name, a description and select “It’s invoked by another process” in the dropdown for “The process starts when.”

A. Select Account as the object and save.

B. Configure the first and only criteria node to always execute.
- Criteria Name: Always Execute
- Criteria for Executing Actions: No criteria – just execute the actions!

C. For the first immediate action, we are invoking a flow. This is a sample setup of a invoking a flow.
- Action Type: Flows
- Action Name: Invoke Flow
- Flow: Update the Account Owner
- Set Flow Variables
- varAccountID Reference [Account].Id
- varAccountState Reference [Account].BillingState

D. For the second immediate action, configure the following to set up the email notification and save…
- Action Type: Email Alerts
- Action Name: Send email to the account owner
- Email Alert: <select the email alert set up>

E. For the third immediate action, configure the following to create a task and save…
- Action Type: Create a Record
- Action Name: Create a task
- Record Type: Task
- Set Field Values:
- Due Date Only Formula today()+3 [Note: This will set the due date to 3 days from today’s date]
- Assigned To Id Reference [Account].OwnerId
- Priority Picklist Normal
- Status Picklist Not Started
- Subject Formula ‘Introduce yourself to the new account: ‘ + [Account].Name

F. Click on the Activate button to activate the invocable process.
2. Now, let’s create the “master” process.
For those using Salesforce Classic, process builder can be found in Create | Workflows & Approvals | Process Builder. In Lightning Experience, it is found under Process Automation | Process Builder.
On the initial creation screen, provide a process name, a description and select “A record changes” in the dropdown for “The process starts when.”

A. Select Account as the object, select “when a record is created or edited” and save.

B. For the first criteria, setup the first criteria node to the following and save:
- Criteria Name: New, State to MA, Universal Containers
- Criteria for Executing Actions: Formula evaluates to true
- Build Formula: (IsNew() || IsChanged ([Account].BillingState )) && [Account].BillingState =’MA’ && [Account].Name =’Universal Containers’

For the immediate action, configure the immediate action to invoke the process and save:
- Action Type: Processes
- Action Name: Invoke Process
- Process: Account Owner Updates and Notifications
- Set Process Variables: Sobject Reference [Account] (Note: Select the account record that started your process)

C. For the second criteria node, setup the second criteria node to the following and save:
- Criteria Name: New, State to NY
- Criteria for Executing Actions: Formula evaluates to true
- Build Formula: (IsNew() || ISCHANGED([Account].BillingState)) && [Account].BillingState=’NY’

For the immediate action, configure the immediate action to invoke the process and save:
- Action Type: Processes
- Action Name: Invoke Process
- Process: Account Owner Updates and Notifications
- Set Process Variables: Sobject Reference [Account] (Note: Select the accounr record that started your process)
For the second immediate action, configure to create a new event and save…
- Action Type: Create a Record
- Action Name: Create an event
- Record Type: Event
- Set Field Values:
- End Date Time Formula [Account].LastModifiedDate + 3 + 10/24 (Note: This sets the end event date/time to the account’s last modified date plus 3 days and 10:oo AM – it’s the 10th hour of 24 hours)
- Assigned To ID Reference [Account].OwnerId
- Start Date Time Formula [Account].LastModifiedDate + 3 + 9/24 (Note: This sets the end event date/time to the account’s last modified date plus 3 days and 9:oo AM – it’s the 9th hour of 24 hours)
- Subject Formula ‘Meeting with account: ‘ + [Account].Name
- Related to ID Reference [Account].Id

D. For the third criteria node, setup the third criteria node to the following and save:
- Criteria Name: Acct Status Changed to Closed
- Criteria for Executing Actions: Conditions are met
- Set Conditions:
- [Account].Account_Status__c Is changed Boolean True (Note: This is an account custom field Account Status that has picklist values “Active” and “Inactive”)
- [Account].Account_Status__c Equals Picklist Inactive
- Conditions: All conditions are met (AND)

Create an immediate action, configure it to update the account’s record type to Account Closed and save.
- Action Type: Update Records
- Action Name: Update record type to account closed
- Record Type: Account (Note: Select the account record that started your process)
- Criteria for Updating Records: No criteria – just update the records!
- Set new field values for the records you update:
- Record Type ID Formula $Label.Closed_Account_Record_Type (Note: I am calling a custom label that contains the 18 character Salesforce ID for the closed account record type. While you can “hardcode” the ID in process builder, rather than calling a custom label, it is not best practice. When you create a new record type in a sandbox and then create it up various sandboxes or in Production, the SFDC ID will not be the same so if you “hardcode” the ID, you would need to update the process builder to update the value in every environment versus just updating the custom label and leaving process builder untouched.)

E. For the fourth criteria node, setup the fourth criteria node to the following and save:
- Criteria Name: New or Acct Status Changed to Gold
- Criteria for Executing Actions: Formula evaluates to true
- Build Formula: (IsNew() ||
(ISCHANGED ([Account].Status__c )) && ISPICKVAL([Account].Status__c, ‘Gold’))

For the immediate action, configure the following to set up the email notification and save…
- Action Type: Email Alerts
- Action Name: Send Email to Tier 1 Team and Acct Owner
- Email Alert: <select the email alert set up>

F. Click on the Activate button to activate the process.
That’s it! Congrats! You’ve implemented a process that invokes another process.
Now, before you deploy the changes to Production, don’t forget to test your configuration changes.
Deployment Notes/Tips:
- Process builders, visual workflows, record type, page layouts, custom fields can be deployed to Production in a change set (or can be deployed using a tool such as Dreamfactory’s Snapshot).
- The field level security for the custom field will need to be manually updated post deployment. I would caution against adding the related profiles in the changeset for deployment as the results of deploying a profile are not reliable. If you have a tool like Snapshot by Dreamfactory, you can use the tool to deploy field permissions.
- Activate the process builders and visual workflows as they are deployed as inactive into Production.
