

Your customer service reps/agents are trying to manage cases as quickly as they can. Unfortunately, when the agent is on a contact or account record, s/he sees a consolidated list of open and closed cases in one related list.
Wouldn’t it be great if you can show a related list of open cases by priority?
What if I told you that this is possible? Hooray…but the skeptical you thinks, “I’m sure it involves programming…
What if I told you that this can be done by any Awesome Admin without a lick of code? Double hooray! I see you doing back flips.
Before I dive into this implementation, I want to give a shout out to Doug Ayers, who posted a similar blog post: Salesforce: Filter Related Lists without Code.
If you don’t follow his blog, you should: https://douglascayers.wordpress.com/. Also, follow him on Twitter.
Here are a few lessons learned from implementing this use case:
- With the use of a lookup fields to the contact and account, you can create custom related lists on those page layouts.
- Use process builder to automate the population of open cases and removal of closed cases from the cases related list.
- Provide descriptions, where provided, in Salesforce. This may be tedious step, I know, but your future self will thank you when you are trying to remember what you configured or assist other/future admins when troubleshooting or enhancing what was built. This includes noting the data stored in a custom field, providing the purpose of a process builder, etc.
Business Use Case: Addison Dogster is a system administrator at Universal Container. Sally Sunshine is the Operations Manager. His agents are complaining that when they receive a call from a contact or account, they are having a hard time weeding through the Cases related list to find the cases that are truly open since the Cases related list shows both open and closed cases. Additionally, there is no way to see the list of cases by priority so they can see the high priority cases first. Sally has requested that her agents be able to see open cases by priority when on the Contact and Account detail record.
Solution: Being the Awesome Admin that she is, Addison is able to solve this declaratively using custom lookup fields and a priority custom field with process builder to automate the population of new open cases and removal of closed cases from the Open Cases by Priority related list. We can do this with clicks, not code.
Quick Steps:
1.Create a custom lookup relationship field called “Contact” to the Cases object. For those using Salesforce Classic, you can create custom fields by going to Setup | Customize | Cases. In Lightning Experience, it is found under Objects and Fields |Object Manager | Case | Fields and Relationships.
By establishing a lookup relationship to the Contact, this will allow us to put our custom related list on the Contact page layout.
- Related to: Contact
- Field Label: Contact
- Related List Label: Open Cases by Priority
Best practice tips:
- Don’t forget to provide a description so you and other/future admins know what this custom field is used for.
- Set the FLS (field level security) for each profile. Only make the field visible and editable for the profiles that need it. Do not just click the “Next” button when you are on the screen.
- Leave this field off the page layouts since this is a processing field. By fault, new fields are added to the page layout.
The end result is this…

2. Create a custom lookup relationship field called “Account” to the Cases object. For those using Salesforce Classic, you can create custom fields by going to Setup | Customize | Cases. In Lightning Experience, it is found under Objects and Fields |Object Manager | Case | Fields and Relationships.
By establishing a lookup relationship to the Account, this will allow us to put our custom related list on the Account page layout.
- Related to: Account
- Field Label: Account
- Related List Label: Open Cases by Priority
Best practice tips:
- Don’t forget to provide a description so you and other/future admins know what this custom field is used for.
- Set the FLS (field level security) for each profile. Only make the field visible and editable for the profiles that need it. Do not just click the “Next” button when you are on the screen.
- Leave this field off the page layouts since this is a processing field. By fault, new fields are added to the page layout.
The end result is this…

3. Create a custom picklist field called “Priority” to the Cases object. For those using Salesforce Classic, you can create custom fields by going to Setup | Customize | Cases. In Lightning Experience, it is found under Objects and Fields |Object Manager | Case | Fields and Relationships.
For the picklist values, we will use: 1-High, 2-Medium and 3-Low. This will allow us to sort the open cases by priority in our custom related list.
Best practice tips:
- Don’t forget to provide a description so you and other/future admins know what this custom field is used for.
- Set the FLS (field level security) for each profile. Only make the field visible and editable for the profiles that need it. Do not just click the “Next” button when you are on the screen.
- Leave this field off the page layouts since this is a processing field. By fault, new fields are added to the page layout.
The end result is this…

4. Now, we need to add the Open Cases by Priority related list to the Contact page layout(s).
For those using Salesforce Classic, go to Setup | Customize | Cases | Page Layouts, click the edit link next to the page layout. In Lightning Experience, it is found under Objects and Fields |Object Manager | Case | Case Page Layouts | click on the page layout name.
Select the Related List category, locate the Open Cases by Priority related list and drag it to the proper location on the Contact Related Lists.
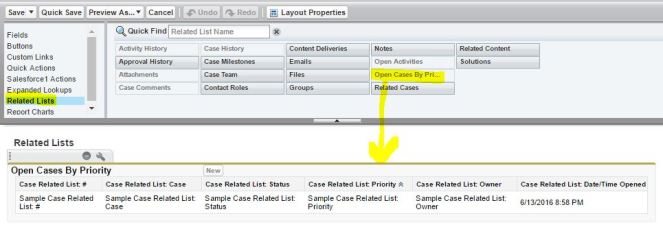
Then, click on the wrench icon, select the fields you want to display the fields on the Open Cases by Priority related list.
Make sure you select the custom Priority field we created in Step 3.
In the Sort By field, select “Case Related List: Priority” by Ascending order.
Click on the “+” in the Buttons select and uncheck the “New” button.

Save the changes to the page layout. Repeat this for each Contact page layout, as needed.
5. Let’s repeat Step #5 and add the Open Cases by Priority related list to the Account page layout(s).
6. Now, let’s create the process builder for the Case object called “Update Open Cases by Priority Related List” and click the “Save” button.

For those using Salesforce Classic, process builder can be found in Create | Workflows & Approvals | Process Builder. In Lightning Experience, it is found under Process Automation | Process Builder.

Best practice tips:
- Don’t forget to provide a description so you and other/future admins know what this process builder is used for.
A. Select “Case” as the object. Select to start the process “when a record is created or edited” and click the “Save” button.

B. For the first criteria node, we will call it “Open Case – New or Priority Changed.” We want this process to execute on open cases that are new or where the priority has changed.
Since we cannot use the picker to select the criteria where the record is new, we will need to use “Formula evaluates to true” for the Criteria for Executing Actions*
This is the syntax to paste in the formula field:
NOT(ISPICKVAL([Case].Status, “Closed”)) &&
(IsNew() ||
ISChanged([Case].Priority)
)

We will now create three immediate actions.
For the first immediate action, in the Immediate Action box, perform the following actions:
- Click on “+ Add Action.”
- Select “Update Records” as the Action Type.
- Let’s call it “Set to 1-High”
- For Record Type, choose “Select the Case record that started your process”
- For Criteria for Updating Records, select “Updated records meets all conditions” where the Priority (this is first priority field, the standard field) equals to “High.”
Set the Priority (this is the second priority, the custom field) to “1-High”
Set Contact to a formula: IF(ISBLANK([Case].ContactId), null, [Case].ContactId)
Set Account to a formula: IF(ISBLANK([Case].AccountId), null, [Case].AccountId)
Your resulting screen should look like this. Click the “Save” button.

For the second immediate action, in the Immediate Action box, perform the following actions:
- Click on “+ Add Action.”
- Select “Update Records” as the Action Type.
- Let’s call it “Set to 2-Medium”
- For Record Type, choose “Select the Case record that started your process”
- For Criteria for Updating Records, select “Updated records meets all conditions” where the Priority (this is first priority field, the standard field) equals to “Medium.”
Set the Priority (this is the second priority, the custom field) to “2-Medium”
Set Contact to a formula: IF(ISBLANK([Case].ContactId), null, [Case].ContactId)
Set Account to a formula: IF(ISBLANK([Case].AccountId), null, [Case].AccountId)
Your resulting screen should look like this. Click the “Save” button.

For the third immediate action, in the Immediate Action box, perform the following actions:
- Click on “+ Add Action.”
- Select “Update Records” as the Action Type.
- Let’s call it “Set to 3-Low”
- For Record Type, choose “Select the Case record that started your process”
- For Criteria for Updating Records, select “Updated records meets all conditions” where the Priority (this is first priority field, the standard field) equals to “Low.”
Set the Priority (this is the second priority, the custom field) to “o”
Set Contact to a formula: IF(ISBLANK([Case].ContactId), null, [Case].ContactId)
Set Account to a formula: IF(ISBLANK([Case].AccountId), null, [Case].AccountId)
Your resulting screen should look like this. Click the “Save” button.

C. Now, we need to create the second criteria node. This will either blank out or update the Account lookup field based on what changed with the Account field on the open case. We will call this criteria node “Open Case – Account Changed”. The condition is [Case].AccountId is changed true.

Don’t forget to click the “Save” button.
Now, we will create two immediate actions.
For the first immediate action, in the Immediate Action box, perform the following actions:
- Click on “+ Add Action.”
- Select “Update Records” as the Action Type.
- Let’s call it “Add Acct lookup”
- For Record Type, choose “Select the Case record that started your process”
- For Criteria for Updating Records, select “Updated records meets all conditions” where the Account ID is null false (this means there is a value in the Account Name field).
Set the Account (this is the custom lookup field) to [Case].AccountId
Your resulting screen should look like this. Click the “Save” button.

For the second immediate action, in the Immediate Action box, perform the following actions:
- Click on “+ Add Action.”
- Select “Update Records” as the Action Type.
- Let’s call it “Blank out acct lookup”
- For Record Type, choose “Select the Case record that started your process”
- For Criteria for Updating Records, select “Updated records meets all conditions” where the Account ID is null true (this means the Account Name field is blank).
Set the Account (this is the custom lookup field) Global Constant to $GlobalConstant.Null (This means that you are blanking out the Account lookup field).
Your resulting screen should look like this. Click the “Save” button.

D. Let’s set the next criteria node. This will either blank out or update the Contact lookup field based on what changed with the Contact field on the open case. We will call this criteria node “Open Case – Contact Changed”. The condition is [Case].ContactId is changed true.
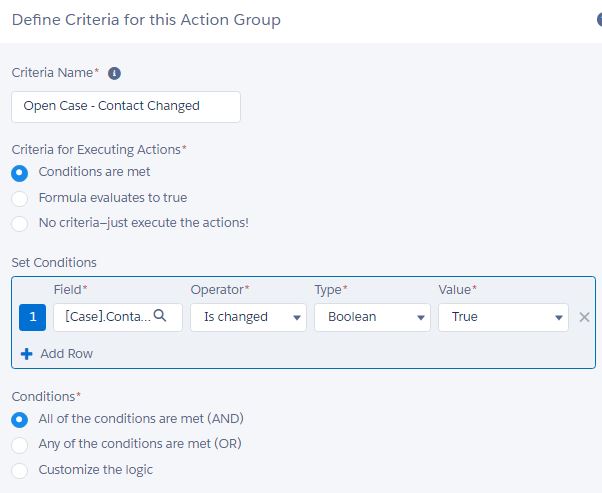
Don’t forget to click the “Save” button.
Now, we will create two immediate actions.
For the first immediate action, in the Immediate Action box, perform the following actions:
- Click on “+ Add Action.”
- Select “Update Records” as the Action Type.
- Let’s call it “Update Contact lookup”
- For Record Type, choose “Select the Case record that started your process”
- For Criteria for Updating Records, select “Updated records meets all conditions” where the Contact ID is null false (this means there is a value in the Contact Name field).
Set the Contact (this is the custom lookup field) to [Case].ContactId
Your resulting screen should look like this. Click the “Save” button.

For the second immediate action, in the Immediate Action box, perform the following actions:
- Click on “+ Add Action.”
- Select “Update Records” as the Action Type.
- Let’s call it “Blank out contact lookup”
- For Record Type, choose “Select the Case record that started your process”
- For Criteria for Updating Records, select “Updated records meets all conditions” where the Contact ID is null true (this means the Contact Name field is blank).
Set the Contact (this is the custom lookup field) Global Constant to $GlobalConstant.Null (This means that you are blanking out the Contact lookup field).
Your resulting screen should look like this. Click the “Save” button.

E. For our last criteria node, if a case status is updated to “Closed”, we need to blank out the Account and Contact lookup fields so that the case record is removed from the Open Cases by Priority related list. Let’s call the criteria “Status Changed to Closed.”
Set the conditions to:
Case Ischanged True
Status equals picklist Closed

For our only immediate action, in the Immediate Action box, perform the following actions:
- Click on “+ Add Action.”
- Select “Update Records” as the Action Type.
- Let’s call it “Blank out fields”
- For Record Type, choose “Select the Case record that started your process”
- Set the new fields to the following:
Contact (this is the custom lookup field) Global Constant to $GlobalConstant.Null (This means that you are blanking out the Contact lookup field).
Set the Account (this is the custom lookup field) Global Constant to $GlobalConstant.Null (This means that you are blanking out the Account lookup field).
Your resulting screen should look like this. Click the “Save” button.

F. Now, go back to the first three criteria nodes, click on the “Stop” and select “Evaluate the next criteria.” Don’t forget to click on the “Save” button.
Note: This new enhancement in Summer 16.

G. Now, you are ready to activate your process builder. Click on the “Activate” button.

That’s it! Congrats! You’ve implemented a process to automate the updates to the Open Cases by Priority related list.
Now, before you deploy the changes to Production, you need to test your configuration changes.
- Login as a user to create a new case with an open status. Assign this to a contact. (Repeat and assign to an account, and a case to both a contact and account).
- Verify that the contact and account lookup fields on the case record are updated accordingly to match the contact name and account name standard fields.
- Verify that the case record appears on the Open Cases by Priority related list on the Contact or Account page layout, as expected.
- Update or remove the contact and/or account standard fields.
- Verify that the contact and account lookup fields on the case record are updated accordingly to match the contact name and account name standard fields or blank out the fields if there is no contact or account.
- Verify that the case record appears on the updated contact or account Open Cases by Priority related list. If the contact or account name was blanked out, verify that the case record no longer appears on the prior contact’s or account’s Open Cases by Priority related list.
- Update the case’s status to closed.
- Verify that the closed case is removed from the Open Cases by Priority related list on the Contact or Account page layout, as expected.
Deployment Notes/Tips:
- The new custom fields and process builder can be deployed to Production in a change set (or can be deployed using a tool such as Dreamfactory’s Snapshot).
- The field level security for the custom activity field will need to be manually updated post deployment. I would caution against adding the related profiles in the changeset for deployment as the results of deploying a profile are not reliable. If you have a tool like Snapshot by Dreamfactory, you can use the tool to deploy field permissions.
- Activate the process builder as it is deployed as inactive into Production.

Love this 🙂
Now just got to find a use case for my business…
LikeLike
Thanks!
LikeLike